Saturday, January 21, 2012

Week 4 - A Change of Plans


Things don't always go according to plan. This week I was going to honor Chinese New Year celebrations with a gluten free egg roll recipe. Unfortunately that recipe blew up in my face (literally, hot oil.. explosion.. no one was hurt but it was scary). SO..This week we are going to talk about kitchen safety!

...

Ok, not really but we are going to talk about something exciting! Bread! Everyone loves a loaf of good home made bread. There are so many variations on the same theme. Unfortunately it's not always easy to find gluten free bread. It's frozen. Or it's in a mix that doesn't quite work. Or when you do it's one of those "healthy" breads. (Not that I have anything against healthy bread but sometimes you really want something, well, white)

This is my version of something between french bread and white sandwich bread. If you are looking for a whole grain loaf with a lot of nutty flavor this is not for you. This it a great bread for the kid's lunch. It is toddler tested and approved. I think it is Jellybean's new favorite snack. Slather on some PB & J and you are good to go. I personally think it tastes pretty amazing with some apple jelly and butter. If I had a toaster I would have toasted it. If I hadn't eaten the whole thing so fast I would have made grilled cheese. Oops! This bread was gone within 24 hours.

Edit: My mom who is a full fledged gluten eater really liked this. She said it tasted "just like real soda bread". She also figured out it was soda bread with out looking at the recipe. She's ridiculous like that. I also was able to successfully shape this into hoagies using slightly under 12oz of soda water. It was fantastic.

What You'll Need:
4oz (1/2c) Warm Water (110°)
1 Tbsp Sugar
1 Tbsp Yeast
6oz Tapioca Flour
6oz Millet Flout
4oz Potato Starch
4oz Sweet Rice Flour
1Tbsp Xanthan Gum
1tsp Salt
12oz (1 1/2c) Sparkling Water
Egg Wash for Crust (Optional)

Mix your sugar, yeast, and warm water then set aside and let the yeast go to town.

In a bowl carefully measure out your flours. (I really insist on using a scale for this recipe. Some recipes you can say "oh 6oz is about 3/4c". Don't do that with bread. It's already fragile.) Then add salt and xanthan gum.
Sift all your dry ingredients together until they become one (or whisk then sift, the sifting is important in this recipe)

Put your mix into the bowl of your mixer and put on the dough hook attachment. Turn the mixer on low speed and slowly add your yeast mixture. Follow with your sparkling water until the dough forms a nice ball. Add your sparkling water very slowly and watch your dough carefully. There will be a point when it all suddenly comes together. When that happens stop adding soda, let your mixer keep going for 10 seconds, then add in about a Tbsp more. Then let your mixer run for about 1 more minute to make sure everything is mixed very well. You will probably need to scrape the bowl once.

Grease your loaf pan well and pour in your dough. (I'm going to try this with no pan tomorrow) Cover with a damp kitchen towel and put somewhere warm. Then let proof for about 25 minutes or until the dough doubles in size.

Preaheat your oven to 400°. Put a pan with an inch or two of water on the bottom rack to help add steam. Paint the top of your bread with a simple egg wash. Then bake for 45min, until crust is golden and "snaps" when you flick it. (It should not feel or sound rock hard, there will be a crustiness but also give.)

Let cool, slice, and enjoy!

For a softer crust put the loaf into a zip top bag or sealed container while it is still warm. The crust will steam and soften much like "grocery store bread".

Happy eating!
Tori

Saturday, January 14, 2012

Week 3 - Chocolate Chip Cookies


What kid doesn't love chocolate chip cookies? I mean really? They are so good! (By kid I mean anyone between the ages of 2 and 200) Now I know that to a certain extent we should be about living healthily. We should be taking the opportunity this drastic life change has given us to become more health conscious in general. For the most part I agree with that sentiment. But everyone needs a cookie jar. Cookies are food for the soul. When you have just had a horrible day a great cookie can lift your spirits. I'm not saying go eat 12 of these. But one or two really won't hurt. I promise. I ate 3 and I am fine. 

These cookies are great. They are soft and light. They make fantastic cookie cake. They have that pillowy quality that everyone tries for but you usually only manage it by accident. I really really like these cookies.

What you'll need:
1c (4 oz) Butter 
2oz White Sugar 
2 oz Brown Sugar 
2 large eggs 
1 tsp vanilla 
3 oz sorghum flour 
3 oz millet flour 
2 oz tapioca flour 
2 oz oat flour 
2 oz cornstarch 
1 tsp xanthan gum 
2 tsp baking powder 
1/2 tsp salt 
2 c ish chocolate chips


In your mixer cream together your butter and both sugars until everything is light and airy.

Slowly incorporate eggs and vanilla until thoroughly mixed.

In a separate bowl mix sorghum flour, millet flour, tapioca flour, oat flour, cornstarch, xanthan gum, baking powder, and salt. Either whisk or sift until the dry ingredients become one.


Turn your mixer on low and add your dry ingredients to your wet in thirds. When everything is fully mixed fold in your chocolate chips.

Roll out cookie size pieces and then flatten them (these cookies do not "spread" very much) to your desired thickness. (mine were about 1/2")

Bake at 350 for 12-15 minutes


If you would like to make a cookie cake roll out your dough to the desired size and shape then bake at 350 for closer to 20 minutes. 

Let cool, pour yourself some milk, and enjoy!

Happy eating!
Tori

Friday, January 13, 2012

Measuring Gluten Free


Merry Christmas everyone! Okay so I'm a tad late, but the sentiment is still there. This year for Christmas I received a great gift. A kitchen scale. It's not accurate to the hundredth of a gram or whatever but it is so much better than measuring by volume. As you may have noticed, this has changed my little world, most of my recipes are now being notated in ounces, not cups. That may change again after some stuff that I read today. But it's okay, kitchen scales can change modes. Here's what you really need to know. Kitchen scales are invaluable. Whether you are gluten free or not. (And if you aren't it will make it so much easier to convert my recipes!)

Since I started putting myself out into the internet world and sharing my creativity I have begun to research. Not just a little bit of research. I have read at least 20 e-books about cooking, I have perused gluten free blogs by the score, and I have asked my husband lots of science questions (sometimes he too looks things up, and then makes fun of me and threatens to buy me an xkcd shirt for cooking. I think they need to make an apron!). One thing that I keep running across is the proclamation that kitchen scales are by far the best way to measure. Especially if one loves to bake.

After this finally seeped into my thick experimentation loving skull I did a face-palm and it all seemed very obvious to me. Any cook worth their salt knows that cooking is about ratios. Any home cook worth their salt understands this but they may not have put it into words. You know that sometimes Aunt Ida's recipe that calls for 2c flour and 3/4c water doesn't feel right, so you trickle in water until it does. That's a ratio. More than likely your nice 16oz  or 2c of flour was more like 20oz because it got packed into the measuring cup more than normal. That is fine and acceptable. But if you aren't as familiar with the recipe something like 4oz of flour can make your mouth feel dusty and give it a "floury" taste. You know what I'm talking about.

So here's the issue, gluten free flours don't all weigh the same. Yeah, it's not fair but it's true. So you can't just substitute 1c of millet for 1c of sorghum if you run out. If you try you are going to end up with a more dense and dry whatever it is you are making. Now if you have a scale 64g is always 64g. No strange volume issues, no problems with flours being packed down more or less by strange tools or bad moods. If you measure out 64g of whatever the heck flour you want, it will always be 64g. Freeing isn't it?

So when you are in a bind with no millet flour think about what properties the other flours have. Pick something that behaves the same way. Then switch it! The flavor may change a little but the texture won't suffer nearly as much. If you are reading my blog and you have issues with corn and there is a recipe with corn flour, change it! Same goes with oat flour or potato starch or sweet rice or.... You get the idea?

Inevitably something is going to go wrong every once in a while. You will replace corn flour with tapioca flour and you'll end up with a crusty funny pizza crust instead of a sweet soft one. I'm still researching. I'm going to try and update my flour list for you, maybe even put a replacement guide. But don't worry. If it gets messed up it's not the end of the world. In fact please let me know! Tell me what you changed and what happened! Maybe I can figure out the why and it will help us all learn a little more about this gluten free world. Then go into your pantry and pull out a box of Annie's Rice Pasta and Cheddar. Your kids will be happy and you will be fed.

Now if you don't have a kitchen scale and you aren't in a position to buy one, don't worry. You can still figure out the recipes. 8oz is about a cup. 4oz is 1/2, etc.. Maybe I'll put up measurement conversions. If you are still stuck email me at milletmommy@gmail.com and I will help you convert it all to volume.

If you are in a position to buy a scale I use this one. It even comes with a bowl! It's not terribly fancy but it's accurate enough for me.

For more info on cooking ratios check out this book. There is even a thing called the Gluten Free Ratio Rally, started by TheGlutenFreeGirl, You should google it.

Hopefully you will find a kitchen scale as freeing as I do. I also hope you get the opportunity to stretch out those cooking muscles and be a little more independent! It's a fun feeling!

Happy eating!
Tori

Saturday, January 7, 2012

Week 2 - Cream of....


This week we tackled a recipe favorite. It's the funk that makes casseroles funky and creamy. We tackled the infamous cream of soup. To be specific we made both cream of mushroom and cream of chicken. I'm pretty sure you could make almost any "cream of" soup from the mushroom recipe. Just substitute the mushrooms for jalapenos, or celery, or whatever. I really really really do not like mushrooms but in a side by side taste test, by both the Nerd and his mom, they agreed the cream of mushroom was really similar. The home made just tasted a little more fresh and strong. The same goes for the cream of chicken (I actually tasted that one). In a side by side tasting of a chicken and rice casserole made with a combination of the two there were no complaints. It was just "a tiny bit different" but "the consistency was the same". I consider that a victory! So if you are desperately missing cream of soups, here's a recipe for you!

Do be aware these are fresh not condensed soups. Where you will need to add water to condensed soup none is needed with the fresh. So if your recipe calls for 1 (10oz) can of soup and 1 (10oz) can of water use 20oz soup. Make the liquid equal and you will be fine.


Cream of Chicken Soup

3 1/2 c Chicken Broth
2c Chicken Breast
1/2 m Onion
1 Bay Leaf
1/2 tsp Garlic Powder
Salt and Pepper to taste
1/4 c Butter
2 Tbsp Rice Flour (I used brown rice)
2 tsp Guar Gum
1/2 c Heavy Cream

Cut your chicken into 1" cubes and poach in your broth or stock. Add your finely chopped onion, bay leaf, garlic powder, salt, and pepper. Cover and cook on low heat for 20min. Once this is done remove your bay leaf and let cool. (If you have a nicer blender that allows hot liquid you can skip the cooling part. If you don't or you are not sure if your blender allows this please please please let it cool.)

Put your soup into a blender and pulse until your chicken is the desired consistency. If you like bigger chicken chunks pulse it a couple times, for more finely cut up bits pulse it 5 or 6 times.

At this point melt your butter in the bottom of a sauce pan. Then whisking the entire time add in your rice flour then your guar gum. Whisk that for about a minute before adding your soup back into the pan.

Then whisk whisk whisk some more over very low heat. You should feel the soup begin to thicken. Turn off the heat and while whisking (yeah, even more) slowly add in your cream. Store in jars or baggies in your desired amount (I used 20oz mason jars that used to be spaghetti sauce jars) and refrigerate for up to 2 weeks.

I have not tried freezing this but have read mixed reviews on freezing cream soups. It seems the cream sometimes separates or gets a "funky flavor" after being frozen. On the other hand people that exclusively use cream soups for cooking say they don't notice anything like this. Feel free to experiment and let me know how it goes.

Because this is not condensed soup this will make 2 "servings", that is 40oz of soup.


Cream of Mushroom Soup

For the most part these are very similar, the methods are the same, it's just a minor change of ingredients.

3 1/2 c Chicken Broth
1oz Dried Porcini Mushrooms
1/2 m Onion
1/2 lb White Button Mushrooms
Salt and Pepper to taste
1/4 c Butter
2 Tbsp Rice Flour
2 tsp Guar Gum
1/2 c Heavy Cream

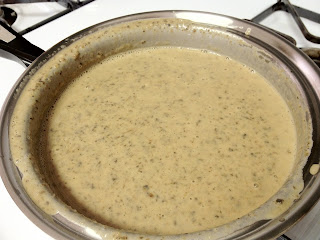
Put your chicken broth and dried porcini mushrooms over medium heat. Cook for 10 minutes until mushrooms are re-hydrated then fish the mushrooms back out and set aside. Add your finely chopped onion and sliced button mushrooms into the infused broth.

Cook covered over low heat for 20 minutes. Then let cool.

Blend to desired consistency.

(Copy and Paste) At this point melt your butter in the bottom of a sauce pan. Then whisking the entire time add in your rice flour then your guar gum. Whisk that for about a minute before adding your soup back into the pan.

Then whisk whisk whisk some more over very low heat. You should feel the soup begin to thicken. Turn off the heat and while whisking (yeah, even more) slowly add in your cream. Store in jars or baggies in your desired amount (I used 20oz mason jars that used to be spaghetti sauce jars) and refrigerate for up to 2 weeks.

This should also make about 40oz of soup.


In terms of casseroles and using this as an ingredient I would say this is a great recipe. The leftovers pictured on the right are gluteny chicken and rice where the casserole on the left was made from the soups today. Overall a big hit! 

Happy eating!
Tori

Sunday, January 1, 2012

52 Weeks of Kitchen Favorites - Week 1 Stock


Happy new year! The start of every new year is an adventure in and of itself. You make resolutions you only halfway intend to keep. Maybe you are about to start a family. You may get a new job, or a new house. Or you may have a new gluten free, restricting, and completely overwhelming diet take over. Anyone who has issues with gluten has been there.

Suddenly you find yourself trying to make grandma's famous pot roast that calls for "cream of whatever" and you can't find any gluten free condensed "cream of" soups. Macaroni and hot dog night seems like a chore and spaghetti just isn't the same made with those gluten free noodles that either taste like corn or fall apart. In the beginning a gluten free diet can seem bleak. I am so sorry.

Here's the good news. Gluten free food can be DELICIOUS. You can have cookies that don't crumble into dust. You CAN have chicken pot pie, and even grandma's famous roast. You may have to tweak a smidge though.

So break out the apron, and buy yourself some new wooden spoons (please don't use old ones, they are so contaminated!), we are going to learn how to cook this year. No more frozen rice bread. No more missing out on chili dog night. No more weird cookies when you just want chocolate chip!! This year it's 52 weeks of kitchen favorites. Everything from your basics, to ketchup, to lasagna, to corned beef and cabbage. We can cook it all.

So lets start the year off right. There is no recipe more basic and more useful than a classic stock. Stock is incredibly easy to make. Yes, you can buy it in the cartons in the store. Yes, they usually have gluten free options. Yes, this tastes 10 thousand times better.

To make an okay stock you need two things. Water and bones. That's it. If you have water and bones, you boil them down and you have stock. But water and bones does not make fantastic stock.

You'll need:
1 medium onion cut into quarters, you can leave the peel it adds nice color
3 good size carrots, peels and all
The leaves and heart from one bunch of celery
Your favorite herbs
A generous pinch of kosher salt
enough water to cover everything

When making chicken stock I generally use a whole chicken and save the cooked meat for later. I don't do any pre-roasting for chicken stock. Even when I use a carcass. It doesn't change the flavor all that much for me. My favorite herbs to use in chicken stock are bay leaf, thyme, sage, and marjoram. I use somewhere between a pinch and a teaspoon of each. Trust your nose. Put everything in the crock pot on low heat for 8-10 hours. When it's all cooked strain out your stock and let it cool to room temperature. (Toss all the wilted veggies, if you have meat on your chicken pick it off. It's tasty!) At this point you can remove the solid fats from the top and store in your choice of container. It will keep in the fridge for 2 weeks and in the freezer for up to 6 months.

For beef stock buy some nice meaty bones with a good amount of marrow in them. Lay out your bones and veggies on a sheet pan, sprinkle with a little olive oil, and roast it at 400° for 20 minutes or so. You want everything to have a caramelized outside. Then put it all in your crock or stock pot. Add in some crushed garlic, thyme, parsley, and oregano. Then cook down for hours and hours. Let cool, strain, remove fat, store.

You can do this with any meat your want or with a whole heap of veggies. This is a great base for soups, gravies, and sauces. Adjust it all to your families taste and health needs. Remember that peels and other castoffs are great for stock because you don't eat the bulk of what goes into it. You get some great flavor and nutrients this way.

Happy eating!
Tori